Tutorial 6
Spritesheets and Automatic City Building
In this tutorial, we will cover using sprite sheets in our games, as well as update
our citybuilding system so that the computer automatically builds cities after
a set amount of time, rather than being added by the player. This will show how
to keep track of time in engo, as well as how to create random events, and
give players the cities they’re supposed to connect when playing the game.
Recap
Remember what we did in the last tutorial?
We utilized a tilemap to add a background to our game. Tilemaps are an easy way to create and place maps made up of tiles to our games.
Final Code
The final code for tutorial 6 is available here at GitHub.
Why use Sprite Sheets?
Sprite sheets are using one big image file containing several images rather than using multiple image files separately. By packaging the textures properly, the disk size of the sprite sheet could potentially be smaller than the size of all the individual files! Another benefit of this is it reduces the number of textures uploaded to the graphics card, which reduces the number of draw calls made, which speeds up rendering of the game.
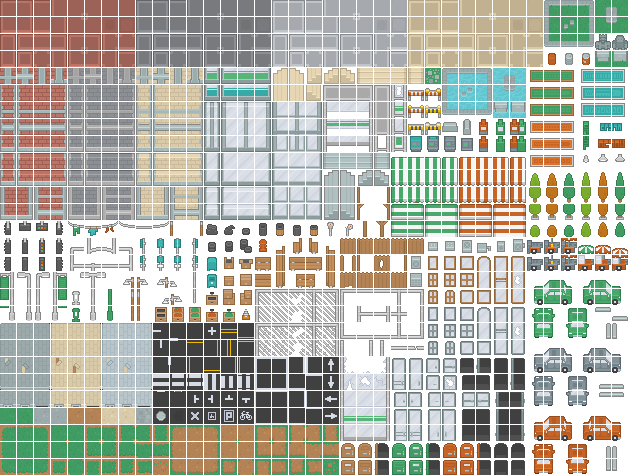
The Sprite Sheet
The file used for this tutorial, can be downloaded here. Extract it into your game’s assets/textures folder. You can also remove the city.png file as it is no longer needed.
Using Sprite Sheets
Engo has several functions for dealing with sprite sheets in common.
common.NewSpritesheetFromFile(textureName, cellWidth, cellHeight) creates a
uniform sprite sheet with the given cellWidth and cellHeight. It will automatically
parse your spritesheet and return a common.Spritesheet corresponding to the provided
file. If your spritesheet has borders or a gap between each sprite, you can use
common.NewSpritesheetWithBorderFromFile(), and if you’re using an asymmetric
sprite sheet you’ll first have to create an []SpriteRegion, which tells the
library the location and size of all your sprites, then you can use that in
common.NewAsymmetricSpritesheetFromFile().
Note: XXXFromFile loads a sprite sheet from a file url, and XXXFromTexture uses a texture you’ve already gotten via
common.LoadedTextureor any other method that supplies a texture already uploaded to the GPU.
First, we’ll add to citybuilding.go a variable to hold our spritesheet
// Spritesheet contains the sprites for the city buildings, cars, and roads
var Spritesheet *common.Spritesheet
Note: Spritesheet is exported because it’ll be needed by other systems down the road
The sprite sheet used for this tutorial will be loaded from file, with 16x16 sprites and a 1 px border around them. So we’ll use the following in our New function for the CityBuildingSystem:
Spritesheet = common.NewSpritesheetWithBorderFromFile("textures/citySheet.png", 16, 16, 1, 1)To use the sprite sheet, we’ll use Spritesheet.Cell(i) where i is the index for
the sprite on our sheet. Zero is the top left-most sprite, and the last sprite
is on the bottom right of the page.
Updating the CityBuildingSystem
Next, we’re going to use the sprite sheet to make new sprites for our cities, and instead of relying on the user to place the cities, we’re going to randomly generate the cities as time goes on.
Utilizing the City Sprite Sheet
To properly utilize the city sprite sheet, we’ll need to keep track of the indices
for the cities on the sheet. We’re going to use a [][]int where each outer
slice will hold the indices for a city put together from the sprites. We’ll then randomly
select one and loop through it to get our whole city to show up on the screen.
Here we generate ten buildings from the tilemap using their indices. Place this
in citybuilding.go
var cities = [...][12]int{
	{99, 100, 101,
		454, 269, 455,
		415, 195, 416,
		452, 306, 453,
	},
	{99, 100, 101,
		268, 269, 270,
		268, 269, 270,
		305, 306, 307,
	},
	{75, 76, 77,
		446, 261, 447,
		446, 261, 447,
		444, 298, 445,
	},
	{75, 76, 77,
		407, 187, 408,
		407, 187, 408,
		444, 298, 445,
	},
	{75, 76, 77,
		186, 150, 188,
		186, 150, 188,
		297, 191, 299,
	},
	{83, 84, 85,
		413, 228, 414,
		411, 191, 412,
		448, 302, 449,
	},
	{83, 84, 85,
		227, 228, 229,
		190, 191, 192,
		301, 302, 303,
	},
	{91, 92, 93,
		241, 242, 243,
		278, 279, 280,
		945, 946, 947,
	},
	{91, 92, 93,
		241, 242, 243,
		278, 279, 280,
		945, 803, 947,
	},
	{91, 92, 93,
		238, 239, 240,
		238, 239, 240,
		312, 313, 314,
	},
}
Randomly Generating Cities at Random Locations
We’re going to randomly pick one of the cities to generate them. This means we’ll
need a psudorandom number generator. To use the one in the math/rand pacakge,
we need to seed it first. Let’s do this in our CityBuildingSystem’s New().
Don’t forget to import math/rand and time.
rand.Seed(time.Now().UnixNano())Now that we have our generator seeded, let’s make a function on our CityBuildingSystem to randomly generate cities!
We’ll want to keep track of which tiles have cities on them. This will be useful for selecting cities, so we don’t build multiple cities on the same tile, and also for other systems. Let’s add it to our CityBuildingSystem’s struct.
var usedTiles []intNow we’re going to make two functions. One generates a city on a random tile on the map. We pick tiles so the cities don’t end up too close together. We’ll also make a function that determines if that tile contains a city already. This is so that we don’t build multiple cities on the same tile.
// generateCity randomly generates a city in a random location on the map
func (cb *CityBuildingSystem) generateCity() {
	x := rand.Intn(18)
	y := rand.Intn(18)
	t := x + y*18

	for cb.isTileUsed(t) {
		if len(cb.usedTiles) > 300 {
			break //to avoid infinite loop
		}
		x = rand.Intn(18)
		y = rand.Intn(18)
		t = x + y*18
	}
	cb.usedTiles = append(cb.usedTiles, t)

	city := rand.Intn(len(cities))
	cityTiles := make([]*City, 0)
	for i := 0; i < 3; i++ {
		for j := 0; j < 4; j++ {
			tile := &City{BasicEntity: ecs.NewBasic()}
      tile.SpaceComponent.Position = engo.Point{
				X: float32(((x+1)*64)+8) + float32(i*16),
				Y: float32(((y + 1) * 64)) + float32(j*16),
			}
			tile.RenderComponent.Drawable = Spritesheet.Cell(cities[city][i+3*j])
			tile.RenderComponent.SetZIndex(1)
			cityTiles = append(cityTiles, tile)
		}
	}

	for _, system := range cb.world.Systems() {
		switch sys := system.(type) {
		case *common.RenderSystem:
			for _, v := range cityTiles {
				sys.Add(&v.BasicEntity, &v.RenderComponent, &v.SpaceComponent)
			}
		}
	}
}

func (cb *CityBuildingSystem) isTileUsed(tile int) bool {
	for _, t := range cb.usedTiles {
		if tile == t {
			return true
		}
	}
	return false
}
That’s a lot! The only really new thing here is the use of rand, everything
else has already been seen when we used tilemaps. First, we pick a random tile to
place the city on, making sure that it doesn’t already have a city on it.
After that, we loop twice through our tiles, i being the x-axis and j
being the y-axis. Each of our cities are 3x4, so we do three times in x and four
for y. We then create the Basic, Space, and Render components of each tile, place
them where they belong and then add them to our tiles. After that, we add the tiles
to common.RenderSystem. This is similar to how we handled the tilemap data when
we generated the background.
Note: we used
tile.RenderComponent.SetZIndex(1)to ensure our cities go on top of the tilemap. Since our HUD is also currently set to 1, this could cause problems with the HUD. We should now go back and set our HUD to a higher index. Since we always want our HUD to be on top, we’ll pick a big number to always render the HUD on top of everything. In traffic.go, we’ll change the HUD’s Z-index to 1000.
Now that we have a function to randomly generate a city on our map, let’s
make sure everything is in working order. We’ll first change our update to just
randomly place cities every 10 seconds. We’ll work on making this more game based
shortly. For now, let’s add elapsed float32 to our CityBuildingSystem struct.
Once we’ve done that, we’ll change our CityBuildingSystem’s Update to
func (cb *CityBuildingSystem) Update(dt float32) {
	cb.elapsed += dt
	if cb.elapsed >= 10 {
		cb.generateCity()
		cb.elapsed = 0
	}
}
Now when we run our game, we should see our map and cities should randomly pop up every ten seconds. Try running it and see!
Citybuilding Timing
Now we’re going to adjust our Update so that the time between building goes down with each iteration. It’ll also randomly choose that time so each game will be different! The times might seem rather long at first, but there’s going to be a lot of things to do when the game is finished, so the long times between cities being added will feel much faster as there’s more to do. We’re going to select the time using a function, and call that function in our update. We’ll also add some more to the CityBuildingSystem struct to keep track of this.
Our final CityBuildingSystem struct looks like this:
type CityBuildingSystem struct {
	world *ecs.World

	mouseTracker CityMouseTracker

	usedTiles []int

	elapsed, buildTime float32
	built              int
}
Our updateBuildTime() function looks like:
func (cb *CityBuildingSystem) updateBuildTime() {
	switch {
	case cb.built < 2:
    // 10 to 15 seconds
		cb.buildTime = 5*rand.Float32() + 10
	case cb.built < 5:
    // 60 to 90 seconds
		cb.buildTime = 30*rand.Float32() + 60
	case cb.built < 10:
    // 30 to 90 seconds
		cb.buildTime = 60*rand.Float32() + 30
	case cb.built < 20:
    // 30 to 65 seconds
		cb.buildTime = 35*rand.Float32() + 30
	case cb.built < 25:
    // 30 to 60 seconds
		cb.buildTime = 30*rand.Float32() + 30
	default:
    // 20 to 40 seconds
		cb.buildTime = 20*rand.Float32() + 20
	}
}
And finally, our final Update() is:
func (cb *CityBuildingSystem) Update(dt float32) {
	cb.elapsed += dt
	if cb.elapsed >= cb.buildTime {
		cb.generateCity()
		cb.elapsed = 0
		cb.updateBuildTime()
		cb.built++
	}
}
Running it now your cities should begin popping up on random tiles, and the delay should get shorter as more cities are added. Next time, we’ll add some text to our HUD and make the cities selectable, which will give you information about how the cities are doing!